LabView Structures: While Loop EN/ES
I never thought I would have to write a whole article to explain the use of the While structure, so far we have used it in every program we have created in C and if I had to explain how it works in C it would not take me more than a paragraph.
While is a repetitive loop structure in which all the code that is inside the loop is executed while a certain condition is met, we write while(condition){code that is executed while the condition is met} with that we would already have enough information to know how to implement a while loop. Wow, it even took me less lines than I expected. 😅
Explaining the use of While Loop in LabView is already another story, in this case it is a graphical programming language and additional features and functions not implemented in the use for other languages will appear and require a little more detailed explanation. I have decided to start teaching with more frequency and detail about the use of LabView starting with the structures, surprisingly this single structure has taken me a whole article, I hope you find the information useful.
Nunca pensé que tendría que escribir todo un artículo para explicar el uso de la estructura While, hasta ahora la hemos usado en cada programa que hemos creado en C y si me tocase explicar su funcionamiento en C no me tomaría más de un párrafo.
While es una estructura de bucle repetitivo en el que se ejecuta todo el código que esté dentro del bucle mientras se cumpla cierta condición, se escribe while(condición){código que se ejecuta mientras se cumple la condición} con eso ya tendríamos suficiente información para saber implementar un while loop. Vaya, incluso me llevó menos líneas de las que esperaba. 😅
Explicar el uso de While Loop en LabView es ya otra historia, en este caso es un lenguaje de programación gráfico y aparecerán características y funciones adicionales no implementados en el uso para otros lenguajes que requieren una explicación un poco mas detallada. He decidido comenzar a enseñar con mas frecuencia y detalle sobre el uso de LabView comenzando por las estructuras, sorprendentemente esta sola estructura me ha tomado un articulo completo, espero que la información te sea útil.

To use the structure we simply right click on the blocks window and inside the folder structures will be all the ones that Labview makes available, for the purposes of our article we choose While loop.
Para usar la estructura simplemente hacemos click derecho en la ventana de bloques y dentro de la carpeta estructuras estarán todas las que Labview pone a disposición, para efectos de nuestro artículo escogemos While loop.

When doing this it will allow us to draw a box on the screen and give it the width and height that we want, everything that we place inside that box will be the equivalent to the code inside the while loop and it will be executed in a repetitive way while the loop is executed.
Now we only have to see how to establish the condition that makes the loop execute and we will find the first difference, for this while a TRUE condition will stop the loop, so there is not a condition to execute but one to avoid it, we can notice two icons inside the box, the one with the red circle is to introduce the stop condition, the loop stops when the condition is TRUE, and a blue icon that is an iteration counter, what it does is to keep track of how many times the loop is executed starting at zero.
Al hacerlo nos permitirá dibujar un cuadro en la pantalla y darle el ancho y alto que queramos, todo lo que coloquemos dentro de ese cuadro será el equivalente al código dentro del while loop y se ejecutará de forma repetitiva mientras se ejecute el bucle.
Ahora solo tenemos que ver cómo establecer la condición que hace que se ejecute el bucle y encontraremos la primera diferencia, para este while una condición TRUE detendrá el bucle, entonces no existe una condición para que se ejecute sino una para evitar que lo haga, podemos notar dos iconos dentro del cuadro, el que tiene el circulo rojo es para introducir la condición de parada, el lazo de detiene cuando la condición es TRUE, y un icono azul que es un contador de iteraciones, lo que hace es llevar la cuenta de cuantas veces se ejecuta el bucle iniciando en cero.

With this information we could implement a while loop, but wait... If it is a repetitive loop it will be many codes running at very high speeds saturating our computer unnecessarily, so it is convenient to add delays between repetitions to give a break to the PC processor.
Labview offers us a block folder with time functions in which two functions can be used to produce delays, in one the delay has the value that appears in its connection point and in the other the value is distributed between work and rest. This delay value can be manipulated as a constant or variable.
Labview takes advantage of the graphical language in which the data flow between blocks is established by the lines that connect them to generate two additional functions in the while loop, the tunnel function and the shift register function. With these we have the possibilities within a while loop that do not include the code that will be executed within it but that can interact with that code to our advantage.
Con esta información podríamos implementar un while loop, pero espere... Si es un bucle repetitivo serán muchos códigos ejecutándose a velocidades muy altas saturando nuestro ordenador de forma innecesaria, así que resulta conveniente añadir retardos entre las repeticiones para darle un respiro al procesador de la PC.
Labview nos ofrece una carpeta de bloques con funciones de tiempo en la que se pueden usar dos funciones para producir retardos, en una el retardo tiene el valor que aparezca en su punto de conexión y en la otra el valor se distribuye entre trabajo y descanso. Este valor de retardo se puede manipular como constante o variable.
Labview aprovecha el lenguaje gráfico en el que se establece el flujo de datos entre bloques mediante las líneas que los conectan para generar dos funciones adicionales en el while loop, la función túnel y la función shift register. Con estas tenemos las posibilidades dentro de un while loop que no incluyen el código que se ejecutara dentro de el pero que pueden interactuar con dicho código para nuestro provecho.

The tunnel is used to handle data in and out of the while loop, we can have input data entering the while loop through a tunnel, in this case they will do it only once before the while loop execution starts but it will have no effect for the repetitive executions.
The same happens with the output tunnels, they are used to extract data from the while loop process but this data is only extracted when the while loop stops, the variations during the repetitive executions are not captured.
The Shift register can also execute the tunnel function but its use is more oriented to the reflow of data within the while, an input data is taken, it is processed and produces an output data, this output data returns to the input and is used again in the process, the previous data can be stacked in a vertical shift down, in this way previous data can be stacked that can also be reused in a process.
Now let's create an example where everything described above applies.
El túnel se usa para manejar datos dentro y fuera del while loop, podemos tener datos de entrada que ingresan al while loop por un túnel, en este caso lo harán solo una vez antes que inicie la ejecución del while loop pero no tendrá efecto para las ejecuciones repetitivas.
Ocurre lo mismo con los túneles de salida, se usan para extraer datos del proceso while loop pero estos datos solo se extraen cuando el while loop se detiene, las variaciones durante las ejecuciones repetitivas nos son captadas.
El Shift register también puede ejecutar la función túnel pero su uso esta mas orientado al reflujo de datos dentro del while, se toma un dato de entrada, se procesa y produce un dato de salida, este dato de salida regresa a la entrada y se vuelve a usar en el proceso, el dato anterior se puede ir apilando en un desplazamiento vertical hacia abajo, de esta forma se pueden ir apilando datos anteriores que también pueden ser reutilizados en un proceso.
Ahora vamos a crear un ejemplo donde aplique todo los descrito.
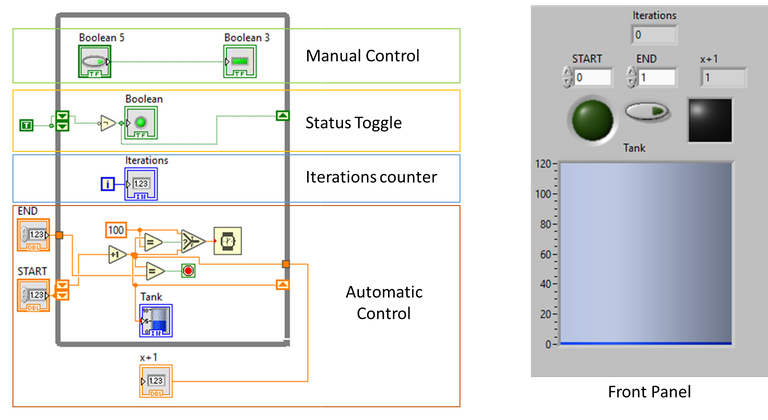
We have 4 processes within the same while loop, the first one is a manual control, it consists of a push button and a led (square), in this case the push button is used to turn on and off the LED, and that must be possible while the while loop is running.
The second one executes the toggle function, we have an external input that arrives to a shift register of two data, then we pass through an inverter and from there we take the data to the output shift register and the state of the LED, if the first data is True the inverter converts it to false and the state of the LED is off, but this false goes to the input of the shift register and becomes the next input data that the inverter will convert to TRUE to turn on the LED, the process will be repeated while running the while loop creating flashing LED (Circular).
In the third one we just place an indicator to monitor the number of iterations that are executed.
The fourth one we need to take a closer look to understand better:
Tenemos 4 procesos dentro de un mismo while loop, el primero es un control manual, consiste en un pulsador y un led (cuadrado), en este caso se usa el pulsador para encender y apagar el LED, y eso debe ser posible mientras el while loop esté en ejecución.
El segundo ejecuta la función toggle, tenemos una entrada externa que llega a un shift register de dos datos, luego pasamos por un inversor y de ahí tomamos el dato al shift register de salida y al estado del LED, si el primer dato es True el inversor lo convierte en false y el estado del led es apagado, pero este false se va a la entrada del shift register y se convierte en el siguiente dato de entrada que el inversor convertirá en TRUE para encender el LED, el proceso se repetirá mientras se ejecute el while loop creando intermitencia en el LED (Circular).
En el tercero solo colocamos un indicador para monitorear el número de iteraciones que se ejecutan.
El cuarto necesitamos mirarlo mas de cerca para comprender mejor:

The first thing we are going to observe is that two external data enter one by a tunnel and another by a shift register, what the shift register does is that it takes the START data that determines where the filling of a tank begins then with an increment block this value is increased by 1 helped by a shift register and when it reaches the value indicated in END the signal will be TRUE to stop the while loop.
The delay between repetitions is variable at the beginning and takes the value of the tank level but when the value reaches 100 it becomes constant at that value, a selector helps us with this function, so a low level will require a fast filling but after a certain level the value becomes stable.
Also an indicator is taken after the increment block but it is placed outside the while loop (x +1) this is done to show that the indicator is not modified until the while loop is stopped.
Another particularity is that several while loops can be executed simultaneously, yes, in C while a while loop is executed the lines of code that are out of it are ignored, in LabView it does not happen the same, to demonstrate it I have created another while loop with functions a little simpler.
Lo primero que vamos a observar es que dos datos externos entran uno por un túnel y otro por un shift register, lo que hace el shift register es que toma el dato START que determina donde inicia el llenado de un tanque luego con un bloque de incremento este valor se incrementa en 1 ayudándose por un shift register y cuando alcance el valor indicado en END la señal será TRUE para detener el while loop.
El retardo entre repeticiones es variable al principio y toma el valor que tenga el nivel del tanque pero cuando el valor llega a 100 se vuelve constante en ese valor, un selector nos ayuda con esta función, de esta forma un nivel bajo exigirá un llenado rápido pero luego de cierto nivel el valor se vuelve estable.
También se toma un indicador luego del bloque de incremento pero se coloca fuera del while loop (x +1) esto se hace para demostrar que el indicador no sufre modificaciones sino hasta que se detiene el while loop.
Otra particularidad es que se pueden ejecutar varios while loop de forma simultánea, si, en C mientras se ejecuta un while loop las lineas de codigo que estan fuera de el son ignoradas, en LabView no pasa igual, para demostrarlo he creado otro while loop con funciones un poco más simples.
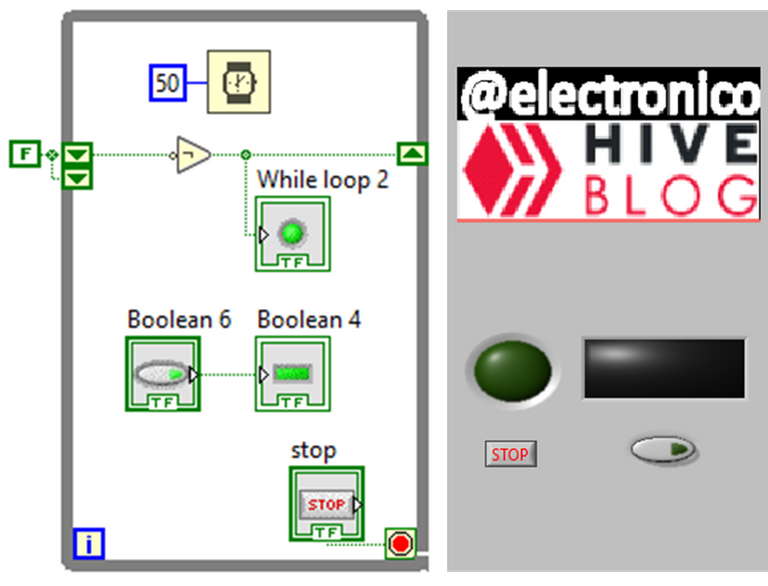
In this second while loop we have a constantly flashing LED, an LED that turns on manually by a push button while the loop is running and a manual STOP stop to stop the loop.
If we look at the data flow we can see that there is data flowing in both loops simultaneously.
En este segundo while loop tenemos un LED con intermitencia constante, un LED que enciende de forma manual por un pulsador mientras se ejecute el bucle y una parada STOP manual para detener el bucle.
Si miramos el flujo de datos podremos apreciar que hay datos fluyendo en ambos bucles de forma simultánea.

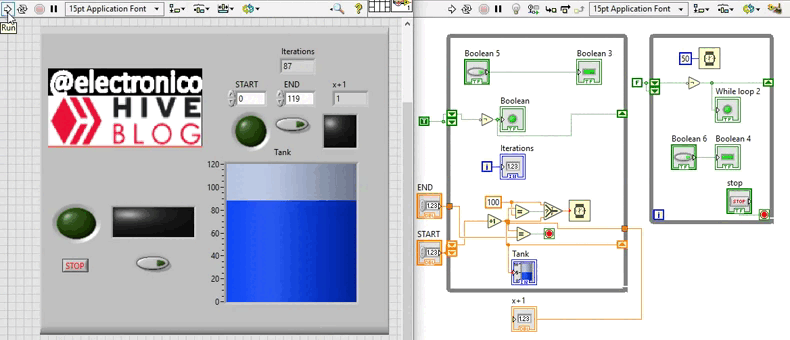
Now let's see how it all works together, the first while will be executed with a variable time, it will start at zero and will end when the input value has increased to 119 which will be reflected in a tank whose level is the value that is increased, there will be a LED with a flashing equivalent to the delay time between each execution and a LED that can be activated with a push button while the while loop is executed, note that when the while loop stops the push button stops having effect on the LED.
You can see how the number of iterations increases until it reaches 118, there are 119 iterations but it counts up to 118 because they start at zero. And we can notice how the value of x + 1 does not change until the while loop stops.
For the second loop we can notice that it is executed simultaneously with the first one, we can see it by the flashing of the LED and we can turn on and off the LED manually, it will serve to see that the first while loop stops and the push button has no influence on the LED even though the overall program continues to run, finally it stops manually.
Ahora veamos como funciona todo junto, el primer while se ejecutara con un tiempo variable, iniciará en cero y terminara cuando el valor e entrada se haya incrementado a 119 lo cual se reflejara en un tanque cuyo nivel es el valor que se incrementa, habrá un led con una intermitencia equivalente al tiempo de retardo entre cada ejecución y un led que puede ser activado con un pulsador mientras se ejecute el while loop, note que cuando el while loop se detiene el pulsador deja de tener efecto sobre el LED.
Se puede apreciar como el número de iteraciones incrementa hasta llegar a 118, son 119 iteraciones pero cuenta hasta 118 porque inician en cero. Y podremos notar como el valor de x + 1 no varía hasta que se detiene el while loop.
Para el segundo bucle podremos notar que se ejecuta de forma simultánea con el primero, podemos verlo por la intermitencia del LED y podemos encender y apagar el LED manual, servirá para ver que el primer while loop se detiene y el pulsador no tiene influencia sobre el LED a pesar de que el programa general sigue corriendo, finalmente se detiene de forma manual.

Yay! 🤗
Your content has been boosted with Ecency Points, by @electronico.
Use Ecency daily to boost your growth on platform!
Support Ecency
Vote for new Proposal
Delegate HP and earn more
Thanks for your contribution to the STEMsocial community. Feel free to join us on discord to get to know the rest of us!
Please consider delegating to the @stemsocial account (85% of the curation rewards are returned).
You may also include @stemsocial as a beneficiary of the rewards of this post to get a stronger support.