LabView: Event log EN/ES
In a monitoring system it is important to keep a record of events or behavior of variables, these records are very useful in data analysis, in addition to detect irregularities in the process and prevent them from producing future failures.
As we have seen in previous articles LabView can be used to create monitoring systems, but so far we have assumed that an operator will always be carrying out the monitoring process, however this can also be automated by having the system itself record the events in a text document.
En un sistema de monitoreo es importante llevar un registro de eventos o comportamiento de variables, estos registros son de mucha utilidad en el análisis de datos, además se pueden detectar irregularidades en el proceso y evitar que las mismas puedan producir fallas futuras.
Como hemos visto en artículos anteriores LabView se puede utilizar para crear sistemas de monitoreo, pero hasta ahora hemos asumido que un operador estará siempre llevando el proceso de monitoreo, sin embargo esto también se puede automatizar haciendo que el propio sistema registre los eventos en un documento de texto.
The events recorded can be any data available in the program, just use the correct function blocks that will allow us to export the events in a text document.
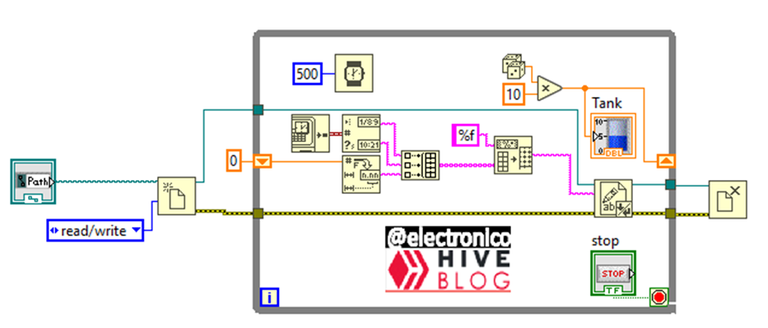
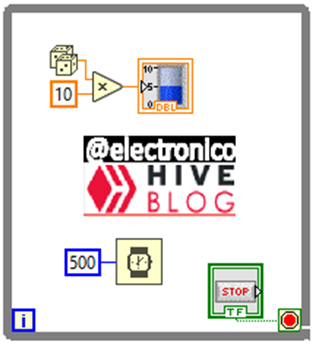
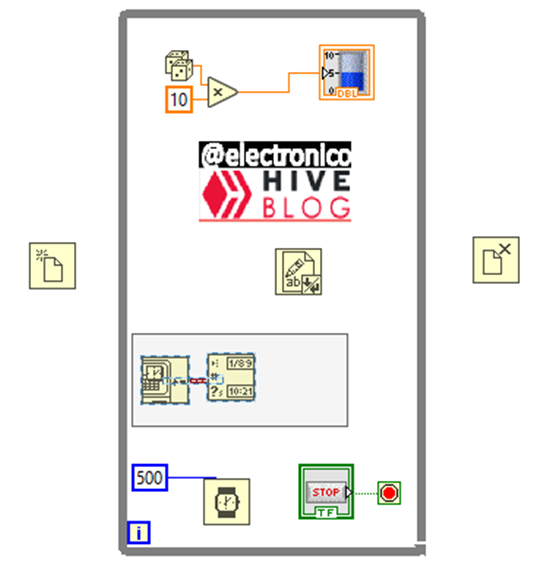
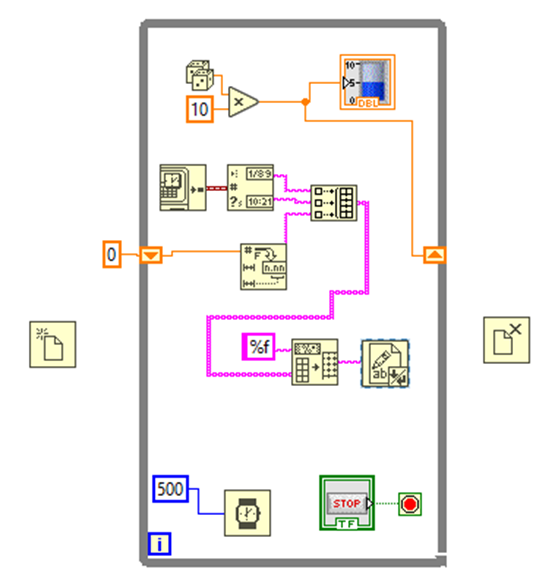
For illustrative purposes I have selected a simple process, a level monitor, but since we do not have a real physical circuit I have used a random block that generates values between 0 and 1 and we multiply it by 10 in order to generate random level values between 0 and 10.
Los eventos registrados pueden ser cualquier dato de que se disponga en el programa, solo se deben usar los bloques de funciones correctos que nos permitirán exportar los eventos en un documento de texto.
Para propósitos ilustrativos he seleccionado un proceso sencillo, un monitor de nivel, pero como no tenemos un circuito físico real he usado un bloque random que genera valores entre 0 y 1 y lo multiplicamos por 10 con la finalidad de generar valores de nivel aleatorios entre 0 y 10.
With this design it is already possible to monitor the level in a tank and an operator can keep a manual record of the values every hour, but we can add redundancy by making the same system make an automatic record, in this way we can compare the system data with the operator's data or if it is a small and personal process dispense with the operator.
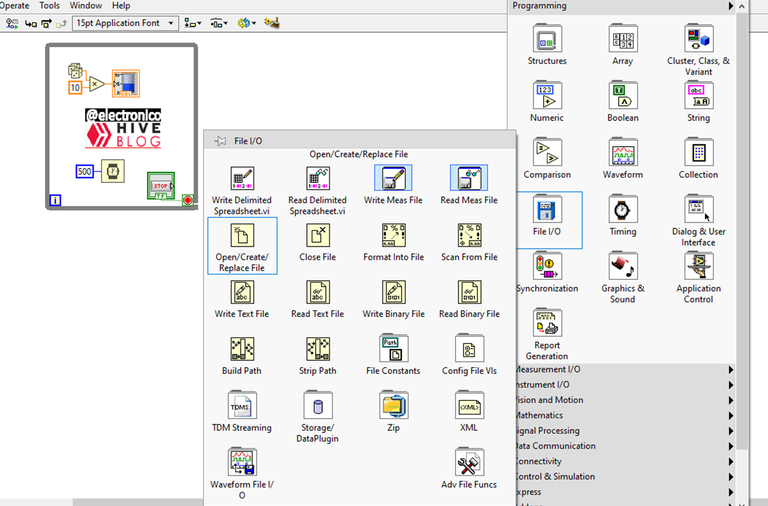
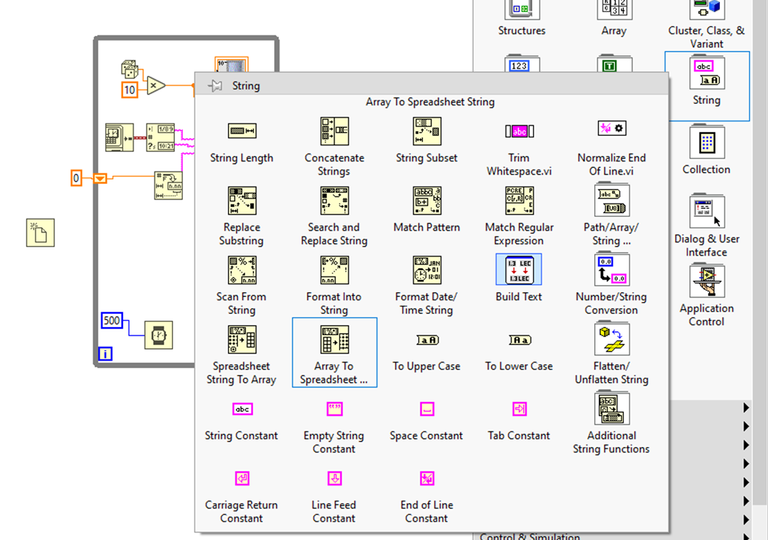
In LabView we have a folder (File I/O) with function blocks for handling external files, from this folder we will rely on 3 basic blocks for this purpose; Open/Create/Replace File will allow us to open the file, Write Text File will allow us to write the data and close file will allow us to close the file to finish writing that data.
Con este diseño ya se puede monitorear el nivel en un tanque y un operador puede llevar un registro manual de los valores cada hora, pero podemos añadir redundancia haciendo que el mismo sistema haga un registro automático, de esta forma podemos comparar los datos del sistema con los del operador o si es un proceso pequeño y personal prescindir del operador.
En LabView disponemos de una carpeta (File I/O) con bloques de funciones para el manejo de archivos externos, de esta carpeta nos apoyaremos en 3 bloques básicos para este propósito; Open/Create/Replace File nos permitirá abrir el archivo, Write Text File nos permitirá escribir el dato y close file nos permitirá cerrar el archivo para finalizar la escritura de ese dato.
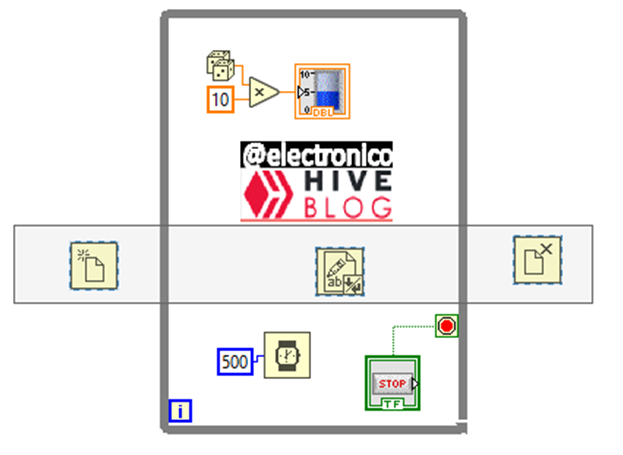
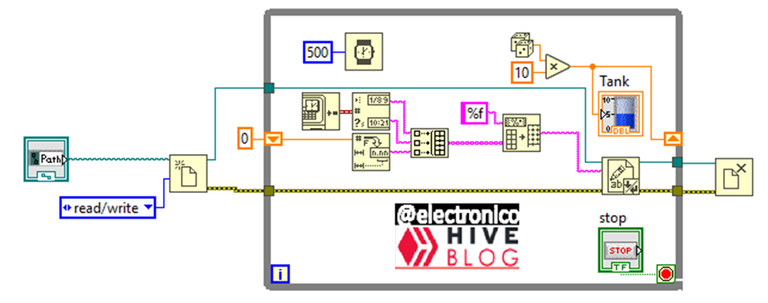
The opening and closing blocks of the file go outside the While structure, the writing block goes inside the While structure and the delay that we always use in the While structure will determine how often a data will be written, in this case we use 500ms but it can be an hour or more since this time in practice can result in a lot of unnecessary data for most cases.
Los bloques de apertura y cierre del archivo van fuera de la estructura While, el bloque de escritura va dentro de la estructura While y el retardo que siempre usamos en la estructura While determinara cada cuanto tiempo se escribirá un dato, en este caso usamos 500ms pero puede ser una hora o mas ya que este tiempo en la práctica puede resultar en muchos datos innecesarios para la mayoría de los casos.
In this case we want to determine what was the level taking into account the date and time at which the samples were taken, for this reason we need to take this time data from a source and of course the computer will be responsible for providing it.
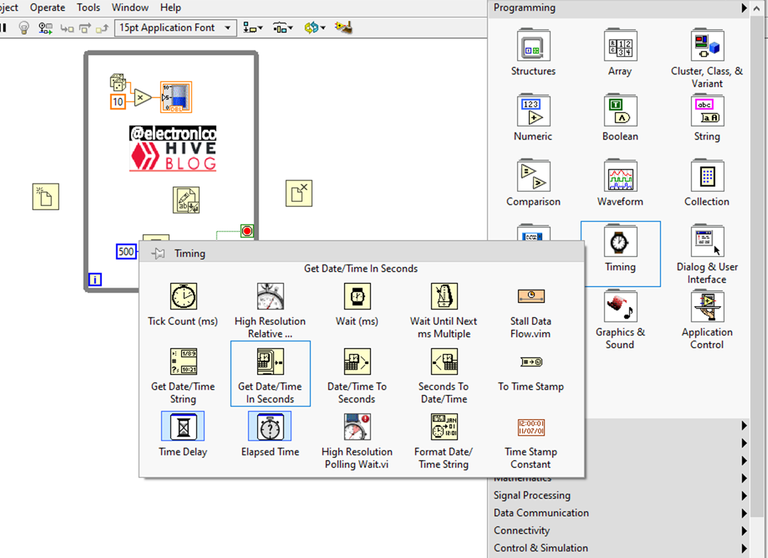
To capture the date and time of the computer in each event we will rely on two blocks of functions located in the Timing functions folder, these blocks are Get Date/Time In Seconds to capture the data we want and Get Date/Time String to give it the correct format needed to be written in the external document.
En este caso queremos determinar cuál fue el nivel tomando en cuenta la fecha y hora en que se tomaron las muestras, por esta razón necesitamos tomar estos datos de tiempo de una fuente y por supuesto el ordenador se encargará de aportarlos.
Para capturar la fecha y hora del ordenador en cada evento nos apoyaremos en dos bloques de funciones ubicados en la carpeta de funciones Timing, estos bloques son Get Date/Time In Seconds para capturar el dato que queremos y Get Date/Time String para darle el formato correcto necesario para ser escrito en el documento externo.
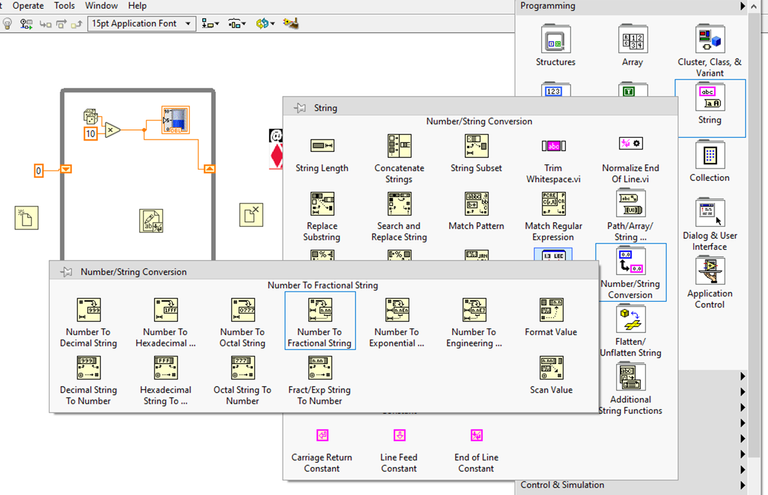
The next step is to condition the variable data so that it can be registered in the document, to take the data we use a shift register.
Lo siguiente es acondicionar el dato de la variable para que pueda ser registrado en el documento, para tomar el dato nos apoyamos en un shift register.
Now we take the Shift register data and convert it to String format, in this way we have 3 data: Date, Time and Level, these are the data that will be registered in each execution of a While cycle, but before taking them to the data writing block we join them in an Array.
Ahora tomamos el dato del Shift register y lo convertimos a formato String, de esta forma tenemos 3 datos: Fecha, Hora y Nivel, estos son los datos que se registrarán en cada ejecución de un ciclo While, pero antes de llevarlos al bloque de escritura de datos los unimos en un Array.
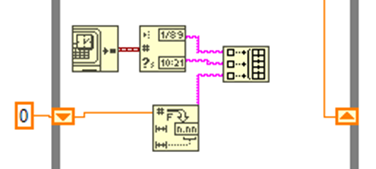
Finally we pack the data and take it to the writing block.
Finalmente empaquetamos el dato y lo llevamos al bloque de escritura.
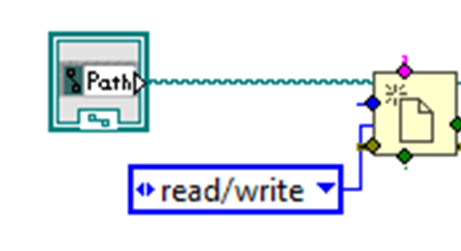
In the file opening function we must create the Path control that will allow us to select the file in which we are going to register the data and enable the read/write accesses as constants.
En la función de apertura de archivo debemos crear el control Path que nos permitirá seleccionar el archivo en el que vamos a registrar los datos y habilitamos los accesos a lectura/escritura como constantes.
To finish with the programming we connect the opening, writing and closing blocks of the file, the complete design is as follows:
Para terminar con la programación conectamos los bloques de apertura, escritura y cierre de archivo, el diseño completo queda de la siguiente forma:
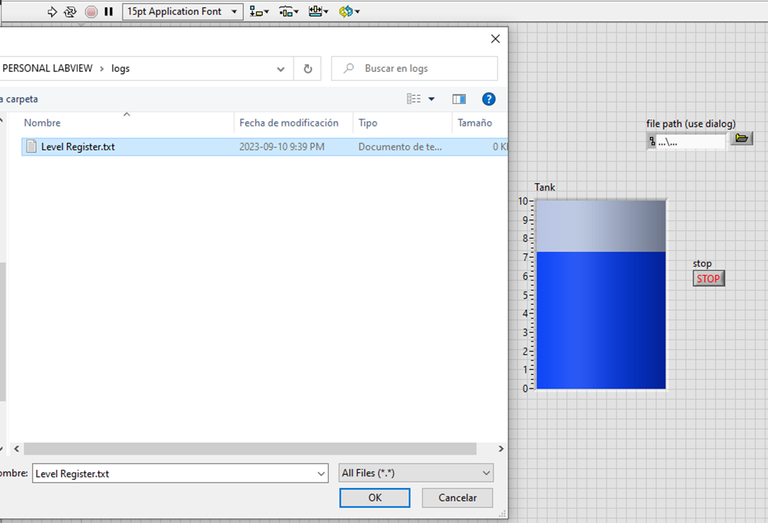
Now in the front panel using the Path control that we created we can select the file in which the data will be recorded, when we click on the folder the file explorer will open and we can search and select or simply create a new one.
Ahora en el panel frontal mediante el control Path que creamos podemos seleccionar el archivo en el que se registrarán los datos, al darle en la carpeta se abrirá el explorador de archivos y podemos buscar y seleccionar o simplemente crear uno nuevo.
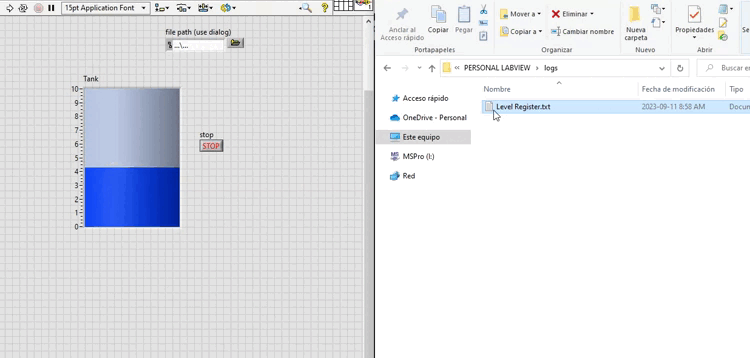
Now that we have everything configured only remains to check it through an execution, remember that the delay that we use in the While structure will be the time interval between a record and another, if we also want to include extra data we must only add them to the array in the form of string.
Ahora que tenemos todo configurado solo resta comprobarlo mediante una ejecución, recuerda que el retardo que usemos en la estructura While sera el intervalo de tiempo entre un registro y otro, si queremos además incluir datos extras solo debemos añadirlos al array en forma de string.


¡Enhorabuena!
✅ Has hecho un buen trabajo, por lo cual tu publicación ha sido valorada y ha recibido el apoyo de parte de CHESS BROTHERS ♔ 💪
♟ Te invitamos a usar nuestra etiqueta #chessbrothers y a que aprendas más sobre nosotros.
♟♟ También puedes contactarnos en nuestro servidor de Discord y promocionar allí tus publicaciones.
♟♟♟ Considera unirte a nuestro trail de curación para que trabajemos en equipo y recibas recompensas automáticamente.
♞♟ Echa un vistazo a nuestra cuenta @chessbrotherspro para que te informes sobre el proceso de curación llevado a diario por nuestro equipo.
🏅 Si quieres obtener ganancias con tu delegacion de HP y apoyar a nuestro proyecto, te invitamos a unirte al plan Master Investor. Aquí puedes aprender cómo hacerlo.
Cordialmente
El equipo de CHESS BROTHERS
Yay! 🤗
Your content has been boosted with Ecency Points, by @electronico.
Use Ecency daily to boost your growth on platform!
Support Ecency
Vote for new Proposal
Delegate HP and earn more
Thanks for your contribution to the STEMsocial community. Feel free to join us on discord to get to know the rest of us!
Please consider delegating to the @stemsocial account (85% of the curation rewards are returned).
Thanks for including @stemsocial as a beneficiary, which gives you stronger support.
Congratulations @electronico! You have completed the following achievement on the Hive blockchain And have been rewarded with New badge(s)
Your next target is to reach 14000 upvotes.
You can view your badges on your board and compare yourself to others in the Ranking
If you no longer want to receive notifications, reply to this comment with the word
STOPCheck out our last posts: