Bootloader on PIC Microcontrollers EN/ES
The new year has barely begun and I am already looking forward to getting back to research, development and educational content. But before we move forward I want to wish you a 2024 full of success, peace, joy and prosperity!
There are different controllers on the market, among the most famous we find Arduino, Raspberry and PIC microcontrollers. Surely there are many others but with these 3 we have enough to have a good time.
We in the blog are addressing so far PIC microcontrollers, a disadvantage of these against other control models is the flexibility to record a program, while Raspberry, Arduino and other types of controllers can be connected directly to a computer to record a program PIC microcontrollers require an additional device for this purpose (PICKIT2, PICKIT3) adding an extra cost to the use of PIC microcontrollers compared to other models.
We can say in favor of PIC microcontrollers that in compensation their pins are more flexible in terms of configuration and use.
In this article we are going to look for a solution to the problem by implementing bootloader, this will allow us to record programs in our PIC microcontrollers directly from a computer without the need of an additional recorder such as PICKIT2 or PICKIT3.
Apenas ha iniciado el año nuevo y ya tengo muchas ganas de volver a la investigación, desarrollo y contenido educativo. Pero antes de avanzar quiero desearte un 2024 lleno de éxitos, paz, alegría y prosperidad!
Existen distintos controladores en el mercado, entre los más famosos encontramos Arduino, Raspberry y microcontroladores PIC. Seguro existen muchos otros pero con estos 3 tenemos suficiente para pasar un buen rato.
Nosotros en el blog estamos abordando hasta ahora microcontroladores PIC, una desventaja de estos frente a otros modelos de control es la flexibilidad para grabarles un programa, mientras que Raspberry, Arduino y otros tipos de controladores pueden conectarse directamente a un ordenador para grabarles un programa los microcontroladores PIC requieren un dispositivo adicional para tal fin (PICKIT2, PICKIT3) añadiendo un costo extra al uso de microcontroladores PIC frente a otros modelos.
Podemos decir a favor de los microcontroladores PIC que en compensación sus pines son más flexibles en cuanto a la configuración y uso.
En este artículo vamos a buscar una solución al problema planteado mediante la implementación de bootloader, esto nos permitirá grabar programas en nuestros microcontroladores PIC directamente desde un ordenador sin necesidad de un grabador adicional como el PICKIT2 o PICKIT3.
A bootloader is a small program that runs during the first few seconds of startup, during this time an action can be executed that allows us to keep running it in order to carry out maintenance work, improvements, among others.
The bootloader is stored in a space of the available memory and is separated from the main program, we could consider it as the equivalent to the Bios of the computer.
By means of a bootloader we can execute the communication between the computer and the microcontroller, as this small program is independent of the main program we can replace the main program as many times as we need without affecting the bootloader, that is why a bootloader that allows to record programs in a PIC becomes of great utility making that we can do without the recorders that we usually use for it.
Un bootloader es un pequeño programa que funciona durante los primeros segundos de arranque, en este tiempo se puede ejecutar una acción que nos permita mantenernos ejecutando el mismo con la finalidad de llevar a cabo labores de mantenimiento, mejoras, entre otras.
El bootloader se almacena en un espacio de la memoria disponible y se separa del programa principal, podríamos considerarlo como el equivalente a la Bios del ordenador.
Mediante un bootloader podemos ejecutar la comunicación entre el ordenador y el microcontrolador, como este pequeño programa es independiente del programa principal podemos reemplazar el programa principal cuantas veces necesitemos sin afectar el bootloader, es por eso que un bootloader que permita grabar programas en un PIC se vuelve de gran utilidad haciendo que podamos prescindir de los grabadores que habitualmente usamos para ello.
I could say that any PIC that has the ability to communicate with a computer can be loaded with a bootloader, what makes the difference is precisely the way it communicates with a computer.
In the case of microcontrollers that only allow UART communication a module that converts TTL-USB or TTL-RS232 signals is needed to establish such communication, in a sense there is still the need for an extra component.
In our case, as you may remember, last year among my acquisitions came a PIC18F2550 that has the capability to communicate to a computer directly via USB, that is precisely the reason why I decide to write now about this topic.
From now on and as long as possible we will develop our projects using the PIC18F2550, we will take advantage of the USB connectivity to record a bootloader and thus save our old PIC recorder, then we will use the same USB connectivity to combine our projects with LabView which will give us a graphical interface for monitoring and control of variables.
There are many ways to implement a bootloader, you can even create your own. But in our case we are going to take advantage of the fact that one already exists that also has a tool for program recordings and is totally free.
Podría decir que cualquier PIC que tenga capacidad para comunicarse con un ordenador puede ser cargado con un bootloader, lo que hace la diferencia es precisamente el modo en que se comunica con un ordenador.
En el caso de los microcontroladores que solo permiten comunicación UART es necesario un módulo que convierte las señales TTL-USB o TTL-RS232 para establecer dicha comunicación, en cierto sentido sigue existiendo la necesidad de un componente extra.
En nuestro caso, como recordarán, el año pasado entre mis adquisiciones vino un PIC18F2550 que tiene capacidad para comunicarse a un ordenador directamente por USB, es precisamente la razón por la que decido escribir ahora sobre este tema.
A partir de ahora y mientras sea posible desarrollaremos nuestros proyectos usando el PIC18F2550, aprovecharemos la conectividad USB para grabar un bootloader y de esa forma guardar nuestro viejo grabador de PICs, luego usaremos la misma conectividad USB para combinar nuestros proyectos con LabView lo que nos aportará una interfaz gráfica para el monitoreo y control de variables.
Existen muchas formas de implementar un bootloader, incluso puedes crear el tuyo propio. Pero en nuestro caso vamos a aprovechar que ya existe uno que además dispone de una herramienta para las grabaciones de programas y es totalmente gratuito.
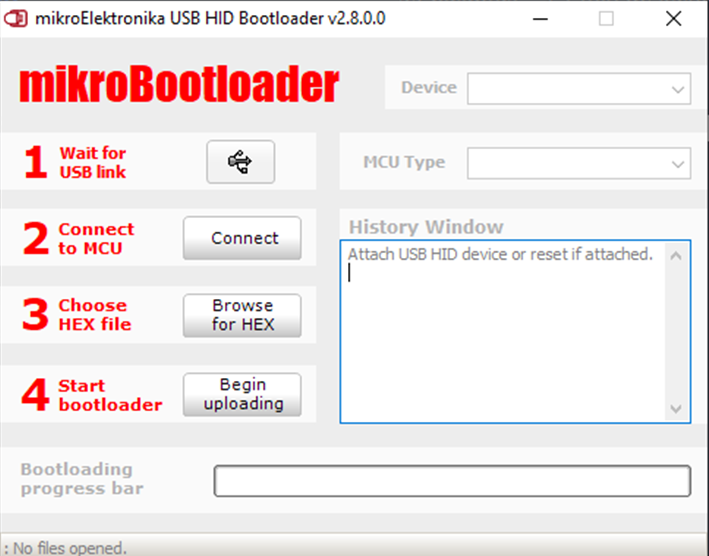
MikroBootloader allows to take advantage of the USB HID interface to communicate with our microcontrollers and record a program using a preloaded bootloader in the microcontroller, all this can be obtained for free from their website.
When downloading and unzipping we will find a folder with the following files:
MikroBootloader permite aprovechar la interfaz USB HID para comunicarse con nuestros microcontroladores y grabarles un programa aprovechando un bootloader precargado en el microcontrolador, todo esto lo puedes obtener de forma gratuita desde su página web.
Al descargar y descomprimir encontraremos una carpeta con los siguientes archivos:
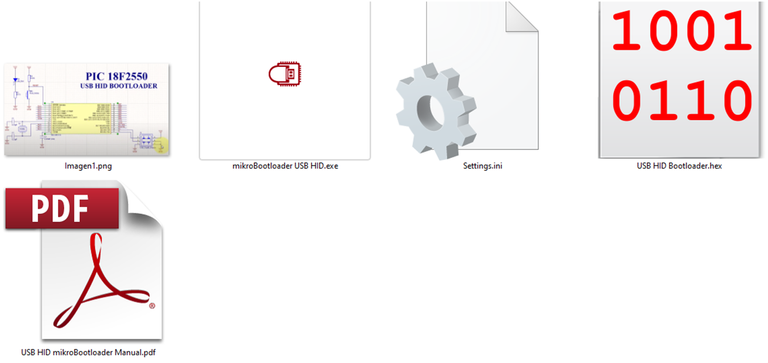
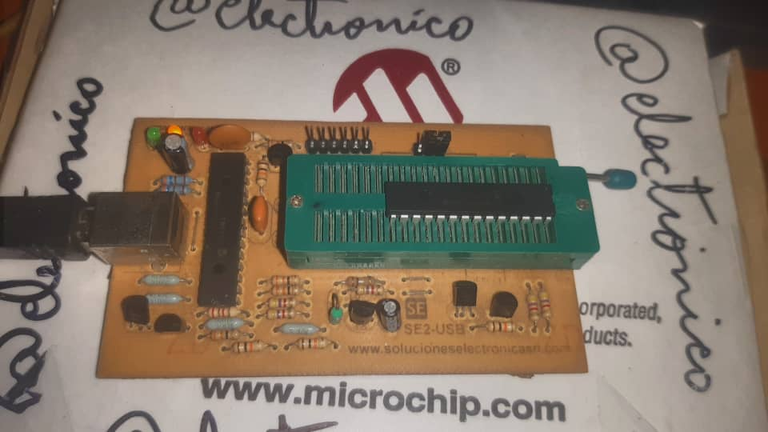
The .HEX file is the bootloader that we must save in our PIC microcontroller, in initial conditions the microcontroller does not have a bootloader and that creates the need to use the usual recorder to load the .hex file, once loaded the usual recorder will no longer be needed to save again that same microcontroller.
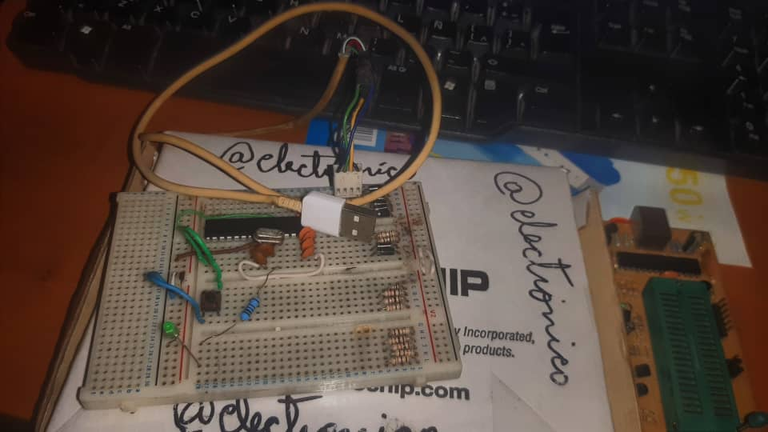
So after recording the .HEX I saved my microcontroller recorder and instead made the fix on my breadboard to communicate my PIC18F2550 with the computer via the USB interface.
El archivo .HEX es el bootloader que debemos grabar en nuestro microcontrolador PIC, en condiciones iniciales el microcontrolador no tiene un bootloader y eso crea la necesidad de usar el grabador habitual para cargar el archivo .hex, una vez cargado ya no hará falta el grabador habitual para grabar de nuevo ese mismo microcontrolador.
Así que luego de grabar el .HEX he guardado mi grabador de microcontroladores y en su lugar he hecho el arreglo en mi protoboard para comunicar mi PIC18F2550 con el ordenador mediante la interfaz USB.
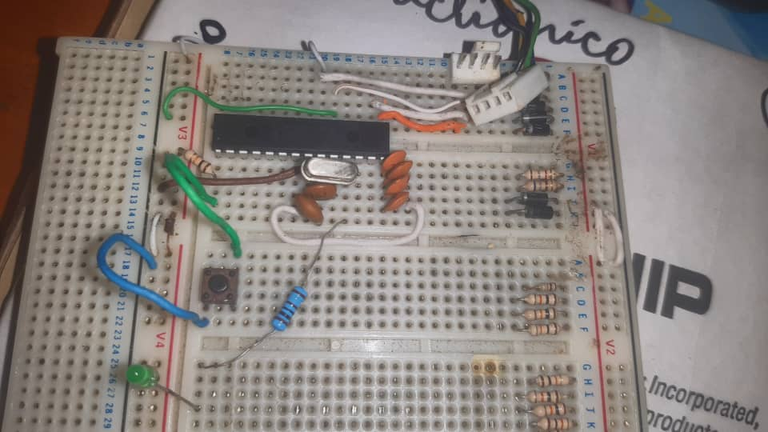
That is the basic circuit that we will need for our future projects with PIC18F2550, the inputs and outputs that are not in use will be the ones available for those projects.
Ese es el circuito básico que necesitaremos para nuestros proyectos futuros con PIC18F2550, las entradas y salidas que no están en uso serán las disponibles para dichos proyectos.

One of the things I like most about this bootloader is that you do not need to press any button to enter bootloader mode, nor do you have to add additional code to your programs, you can even record programs that you have done before recording the bootloader.
The operation is simple, open the program, connect the microcontroller to the computer using the USB cable and observe that it has recognized (it will appear in the program that you run on the computer), once it appears you have 5 seconds to keep the bootloader, this is done by clicking on Connect, if after 5 seconds you have not clicked there will start the main program and you will have to repeat the process.
When you have connected now click on Browse for HEX to select the program we want to upload to our microcontroller (main program) and once loaded finally click on Begin uploading to save it.
I have created a gif with the execution of all this process for a better illustration of what I have said.
Una de las cosas que más me gusta de este bootloader es que no necesitas presionar ningún pulsador para entrar en modo bootloader, tampoco tienes que agregar código adicional a tus programas, puedes incluso grabar programas que hayas hecho antes de grabar el bootloader.
El funcionamiento es sencillo, abres el programa, conectas el microcontrolador al ordenador mediante el cable USB y observas que lo haya reconocido (Aparecerá en el programa que ejecutas en el ordenador), una vez que aparece dispones de 5 segundos para mantener el bootloader, esto se hace dando click en Connect, si pasados los 5 segundos no has dado click ahí iniciará el programa principal y tendrás que repetir el proceso.
Cuando hayas conectado ahora le das en Browse for HEX para seleccionar el programa que deseamos cargar en nuestro microcontrolador (programa principal) y una vez cargado finalmente le damos en Begin uploading para grabarlo.
He creado un gif con la ejecución de todo este proceso para una mejor ilustración de lo dicho.

As we can see now it is possible to record programs on our PIC18F2550 using only the computer without the need of an extra device like the PICKIT2, PICKIT3. Super right?
Como podemos ver ahora es posible grabar programas en nuestro PIC18F2550 usando solo el ordenador sin necesidad de un dispositivo extra como el PICKIT2, PICKIT3. Super ¿Verdad?
If you want to give an extra boost to the blog with a donation you can send it to the addresses:
Si quieres darle un impulso extra al blog con una donación puedes enviarla a las direcciones:
BEP-20: 0x5Aee5e3e3ED3203e77eF0d8Bb3E3a420E5229Ce0
ERC-20: 0x5Aee5e3e3ED3203e77eF0d8Bb3E3a420E5229Ce0
Arbitrum One: 0x5Aee5e3e3ED3203e77eF0d8Bb3E3a420E5229Ce0
Polygon: 0x5Aee5e3e3ED3203e77eF0d8Bb3E3a420E5229Ce0
Avalanche: 0x5Aee5e3e3ED3203e77eF0d8Bb3E3a420E5229Ce0
Yay! 🤗
Your content has been boosted with Ecency Points, by @electronico.
Use Ecency daily to boost your growth on platform!
Thanks for your contribution to the STEMsocial community. Feel free to join us on discord to get to know the rest of us!
Please consider delegating to the @stemsocial account (85% of the curation rewards are returned).
Thanks for including @stemsocial as a beneficiary, which gives you stronger support.
Interesante escrito amigo, estuve ojeando tu perfil y tienes muy buenos escritos referidos a la electrónica. Ya que tus posts también llevan el idioma español, te invito a que entre tus primeros 5 tags uses también la de: stem-espanol así tal cual está escrito sin la "ñ" de español, esto aumentará tus posibilidades de ser visualizado por más curadores de stem. Feliz y exitoso 2024 amigo, saludos.
Hola amigo, qué alegría me da haber causado buena impresión. También agradezco su invitación!
Igual para tí amigo, feliz y exitoso 2024. Gracias por visitar mi blog.!