The Build of my New Desktop PC! STEP 3: CPU Installation on the Motherboard (ENG/ITA)

Cover Image: photo of my property: my Desktop Pc
 La versione in italiano è subito dopo la versione in inglese - The Italian version is immediately after the English version

It's time to build a new desktop PC! Step Two: Components Purchased!

After more than 12 years I decided to send my (dinosaur) Desktop Pc on vacation to build a new Pc.
My current "dinosaur" Desktop PC has this configuration:
- CPU: Intel i3-530
- RAM: 6 GB DDR3
- VIDEO: NVIDIA GeForce 9500 GT 1 GB
- HD: SSD 250 GB
- 3 HDD: 4 Terabyte in totale
My new Desktop PC will have this configuration:
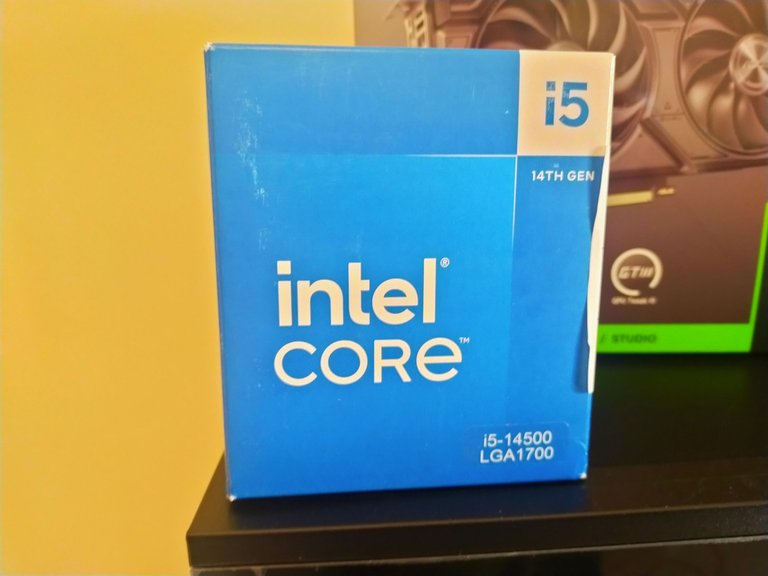
- CPU: Intel i5-14500
- RAM: 32 GB DDR5
- VIDEO: NVIDIA GeForce RTX 4060 OC 8GB
- HD: 2TB M.2 SSD
Ten days ago I chose the components to buy and shared my choices in the post you can read at this link: It's time to assemble my new Desktop PC! Step one: Choosing components to purchase (ENG/ITA)
Four days ago I shared the component purchasing step in the post you can read at this link: It's time to Build my new Desktop PC! STEP TWO: Components Purchased! (ENG/ITA)
Today I continue to share my progress in building my new desktop PC.
I bought all the components from Amazon except the CPU which I bought from another online shop because I saved almost 40 euros from the lowest price I found on Amazon.
Finally yesterday the courier also delivered the CPU to me, so I had everything I needed to start assembling my new desktop PC.
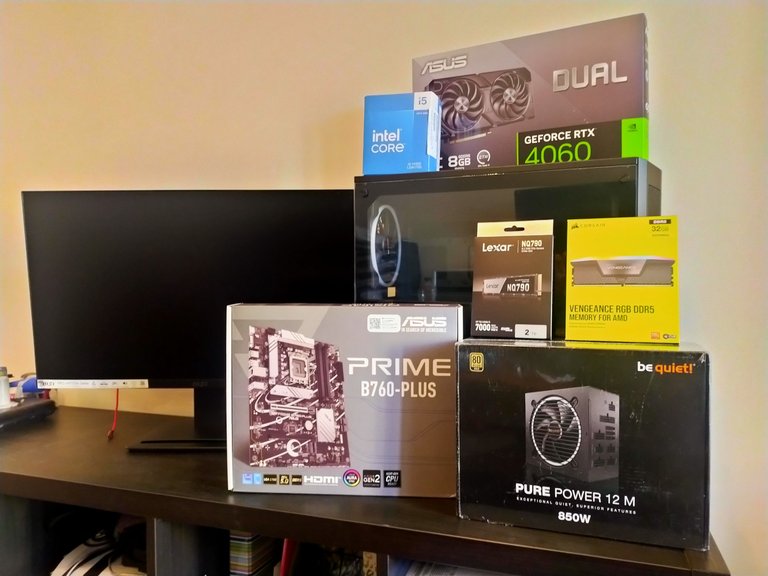
In the next picture you can see all the components I purchased to build my new desktop pc.
The first step in assembling a new desktop Pc is the installation of the CPU.
Those who have never assembled a pc might think that CPU installation is a complicated operation, but instead it is a very simple and quick operation.
The most important part when assembling a new pc is configuration = choosing components that are compatible with each other but assembly is a relatively very simple operation.
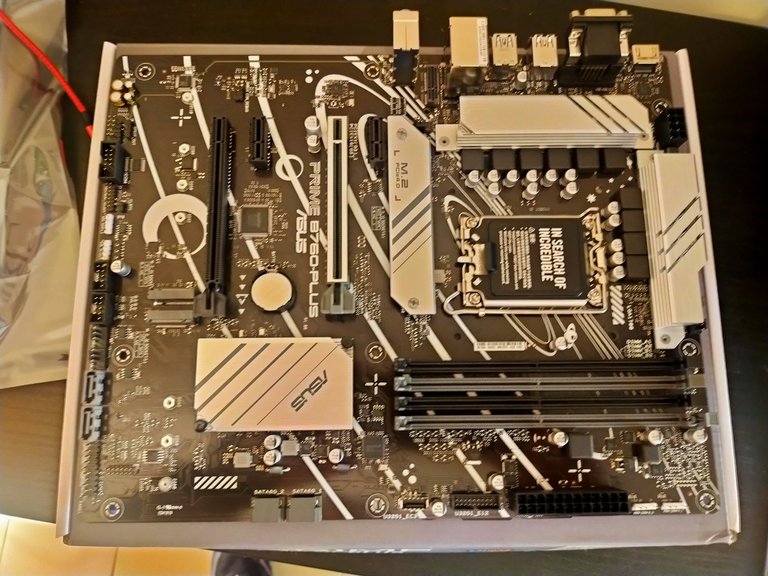
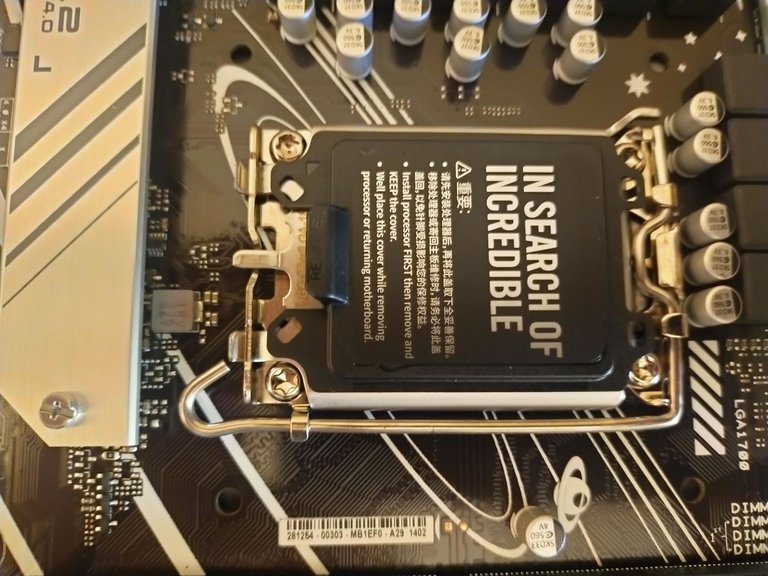
I purchased the motherboard: ASUS Prime B760-PLUS: Intel LGA 1700 ATX motherboard, DDR5 PCIe 5.0, 3 M.2 slots, ...
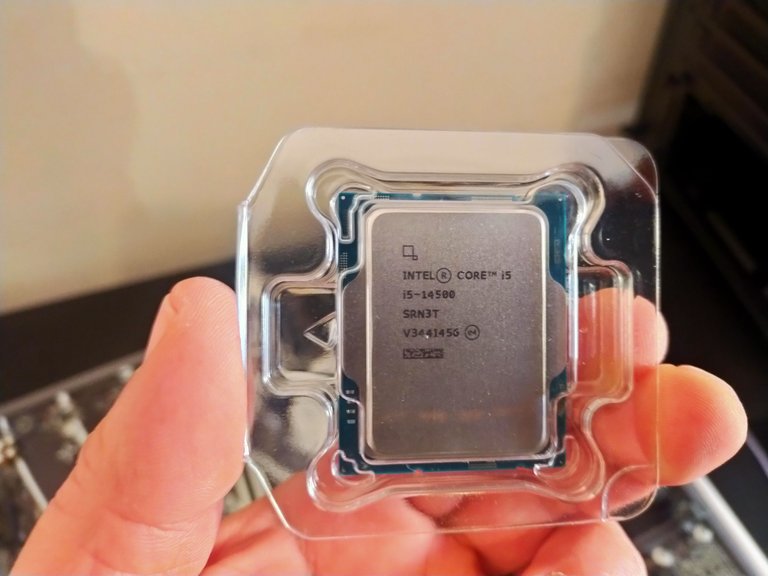
On which I decided to mount Intel's 14th generation CPU: i5-14500
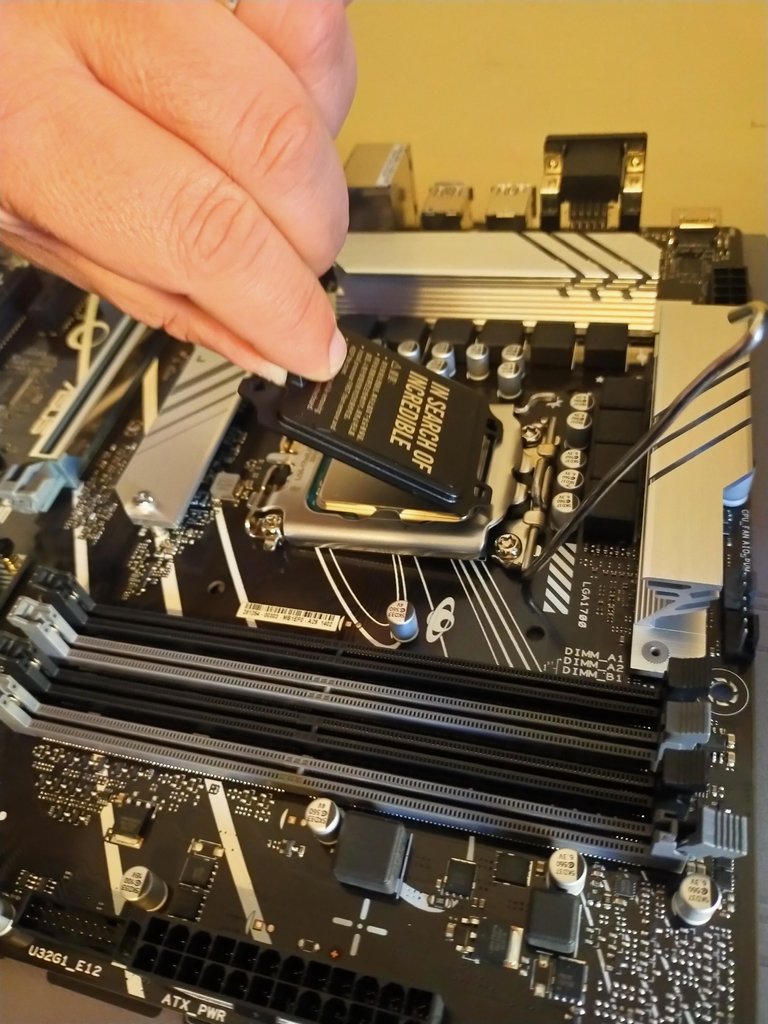
Before mounting the CPU on the Motherboard, it is important to:
- discharge electrostatic energy by touching an iron object with your hands.
- place the motherboard on a clean, non-conductive surface.
I placed my motherboard on the box it was in. - avoid touching the CPU pins with your hands
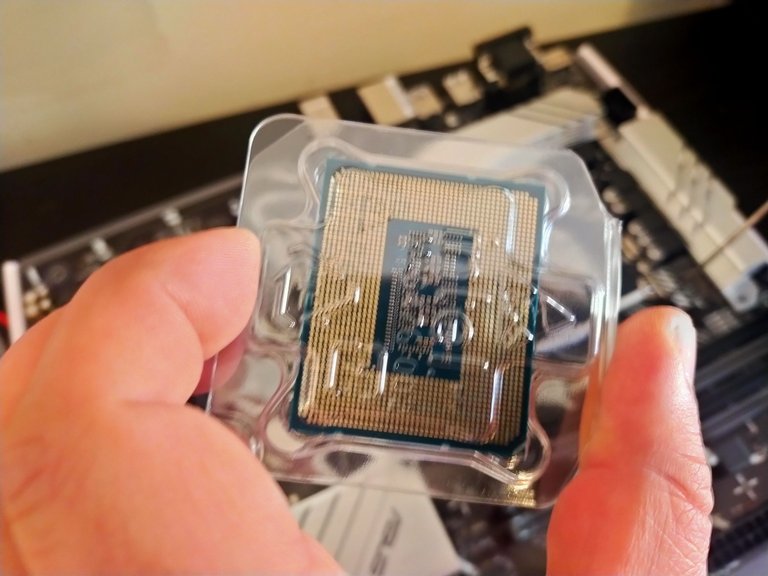
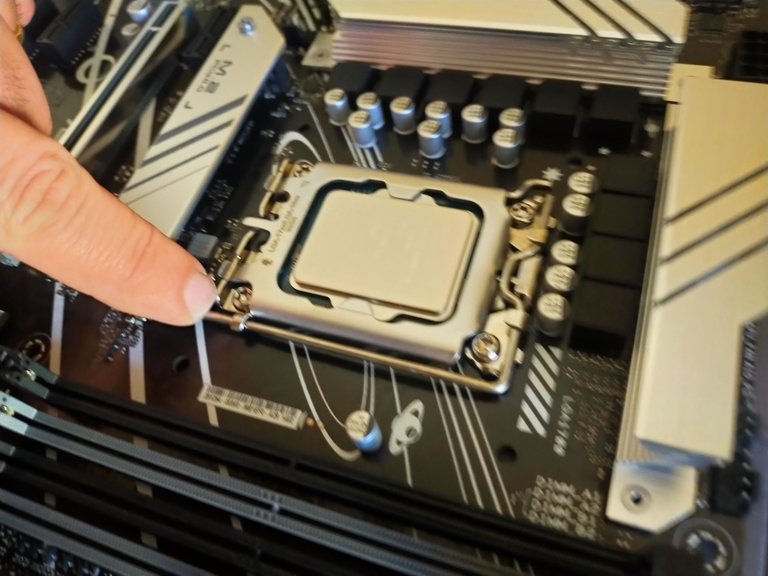
I levered up the socket retaining arm present on the motherboard and gently placed the CPU inside the socket.
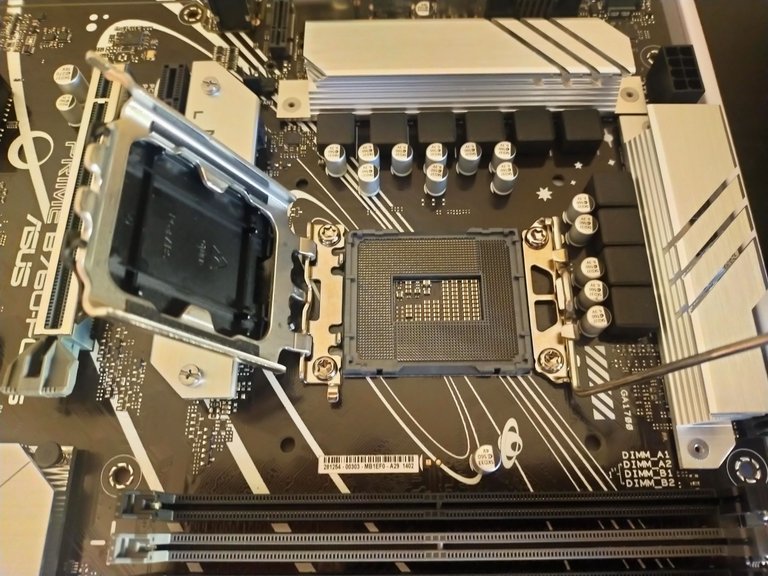

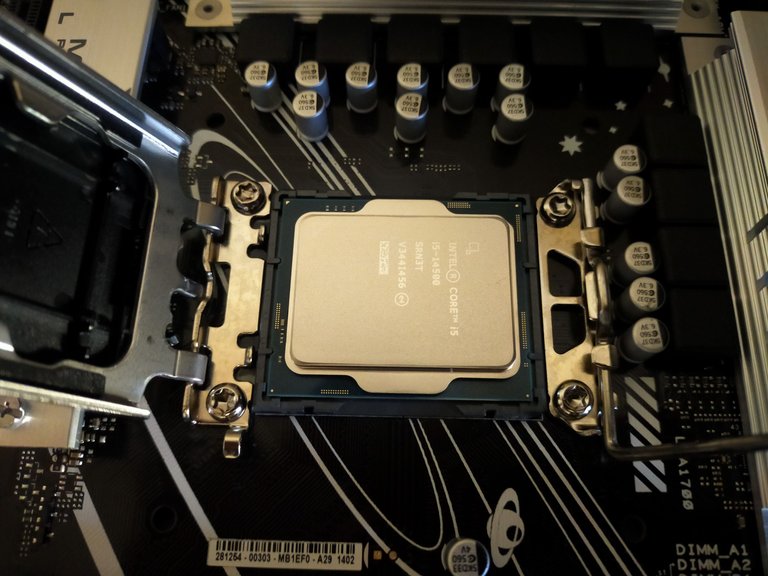
Then I closed the cover again, removed the plastic cover, and lowered the mounting bracket.
The next step was to fix the CPU Heatsink on the CPU.
Not needing to overclock, I chose to use Intel's heatsink that I found in the CPU box that already has thermal paste.
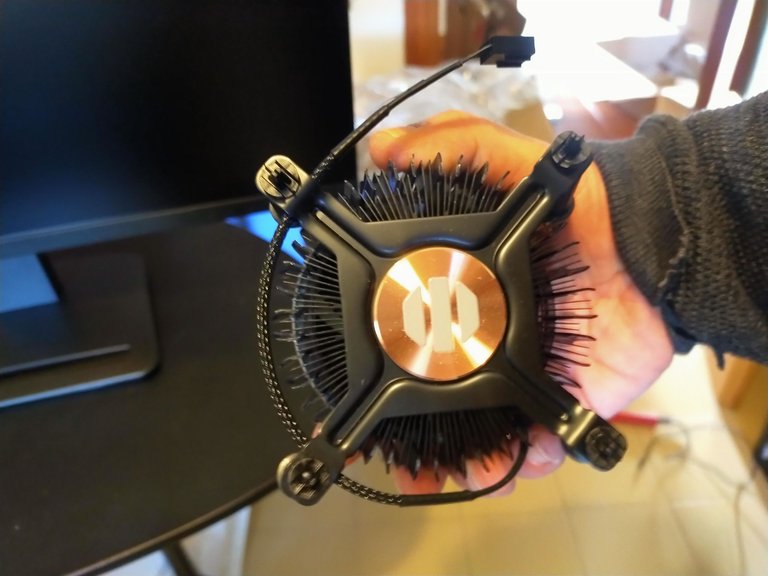
Installing the CPU heatsink was also very easy.
I placed the heatsink in the four holes around the CPU on the motherboard and turned the four screws 90° to the left.
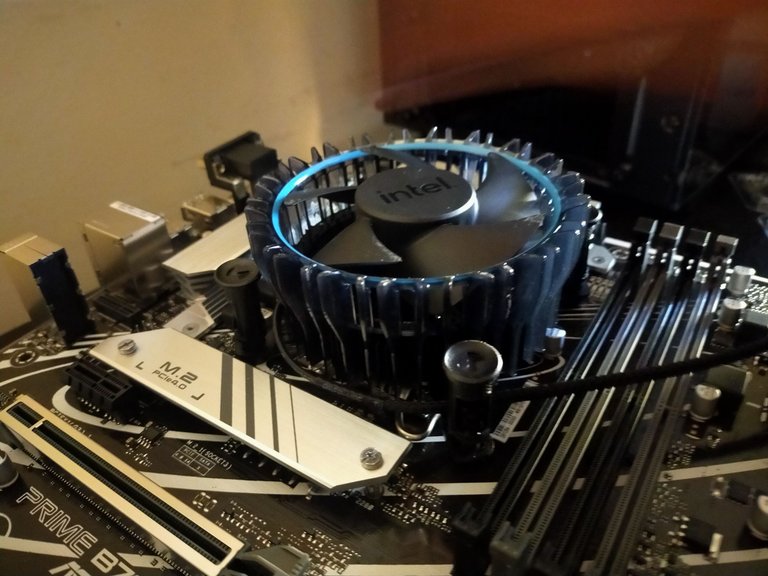
It took me about 20 minutes to install the CPU into the motherboard socket but the effective time was only a few minutes because I spent most of the time reading the instructions for screwing the screws of the heatsink.
In my next posts I will share the other steps I took to build my new desktop pc.
I hope you liked my post and thank you for taking your time to read it!

La costruzione del mio nuovo PC Desktop! FASE 3: Installazione della CPU sulla scheda madre
Dopo più di 12 anni ho deciso di mandare in vacanza il mio (dinosaur) Desktop Pc per costruire un nuovo Pc.
Il mio attuale "dinosaur" Desktop PC ha la seguente configurazione:
- CPU: Intel i3-530
- RAM: 6 GB DDR3
- VIDEO: NVIDIA GeForce 9500 GT 1 GB
- HD: SSD 250 GB
- 3 HDD: 4 Terabyte in totale
Il mio nuovo Desktop PC avrà la seguente configurazione:
- CPU: Intel i5-14500
- RAM: 32 GB DDR5
- VIDEO: NVIDIA GeForce RTX 4060 OC 8GB
- HD: 2TB M.2 SSD
Dieci giorni fa ho scelto i componenti da acquistare e ho condiviso le mie scelte nel post che puoi leggere a questo link: It's time to assemble my new Desktop PC! Step one: Choosing components to purchase (ENG/ITA)
Quattro giorni fa ho condiviso la fase di acquisto dei componenti nel post che puoi leggere a questo link: It's time to Build my new Desktop PC! STEP TWO: Components Purchased! (ENG/ITA)
Oggi continuo a condividere i miei progressi nella costruzione del mio nuovo desktop PC.
Ho acquistato tutti i componenti da Amazon tramme la CPU che ho acquistato da un altro shop online perchè ho risparmiato quasi 40 euro rispetto al prezzo più basso che avevo trovato su Amazon.
Finalmente ieri il corriere mi ha consegnato anche la CPU e quindi ho avuto tutto l'occorrente per iniziare l'assemblaggio del mio nuovo desktop PC.
Nella foto seguente puoi vedere tutti i componenti che ho acquistato per costruire il mio nuovo desktop pc.
Il primo passo per assemblare un nuovo desktop Pc è l'istallazione della CPU.
Chi non ha mai assemblato un pc potrebbe pensare che l'installazione della CPU è un operazione complicata e invece è un'operazione molto semplice e veloce.
La parte più importante quando si assembla un nuovo pc è la configurazione = scegliere componenti compatibili tra di loro ma l'assemblaggio è un operazione relativamente molto semplice.
Io ho acquistato la motherboard: ASUS Prime B760-PLUS: Scheda madre Intel LGA 1700 ATX, DDR5 PCIe 5.0, 3 slot M.2, ...
Su cui ho deciso di montare la CPU di quattordicesima generazione di Intel: i5-14500
Prima di montare la CPU sulla Motherboard è importante:
- scaricare l'energia elettrostatica toccando con le mani un oggetto di ferro
- posizionare la motherboard su una superfice pulita e non conduttiva
Io ho poggiato la mia motherboard sulla scatola in cui era contenuta - evitare di toccare con le mani i piedini della CPU
Ho sollevato il braccio di ritenzione del socket presente sulla scheda madre e con delicatezza ho posizionato la CPU all'interno del socket.
Poi ho richiuso la copertura, ho rimosso la copertura in plastica e ho abbassato la staffa di fissaggio.
Il passo successivo è stato fissare il dissipatore della CPU sulla CPU.
Non avendo necessità di fare overclocking ho scelto di utilizzare il dissipatore di Intel che ho trovato nella box della CPU che ha già la pasta termica.
Anche l'installazione del dissipatore della CPU è stato molto semplice.
Ho posizionato il dissipatore nei quattro fori intorno alla CPU presenti sulla scheda madre e ho girato di 90° le quattro viti verso sinistra.
Ho impiegato circa 20 minuti per installare la CPU nel socket della scheda madre ma il tempo effettivo è stato di pochi minuti perchè la maggior parte del tempo l'ho impiegata per leggere le istruzioni per avvitare le viti del dissipatore.
Nei miei prossimi post condividerò gli altri step che ho effettuato per costruire il mio nuovo desktop pc.

Posted Using InLeo Alpha
Posted Using InLeo Alpha
This post has been manually curated by @steemflow from Indiaunited community. Join us on our Discord Server.
Do you know that you can earn a passive income by delegating to @indiaunited. We share more than 100 % of the curation rewards with the delegators in the form of IUC tokens. HP delegators and IUC token holders also get upto 20% additional vote weight.
Here are some handy links for delegations: 100HP, 250HP, 500HP, 1000HP.
100% of the rewards from this comment goes to the curator for their manual curation efforts. Please encourage the curator @steemflow by upvoting this comment and support the community by voting the posts made by @indiaunited.
thanks a lot for the support
!PGM
!PIZZA
Io queste cose qui non le so proprio fare… comunque stavo avvertendo anch’io la voglia di avere un PC desktop e magari usarlo per dare una mano computazionale alla blockchain di HIVE, cioè, stavo pensando di fare anche da supporto strutturale per HIVE, in maniera da essere un supporter più completo. Intanto mi prendo appunti da questo post per le eventuali caratteristiche che potrebbe avere un PC desktop
Ciao amico mio, costruire un pc è più difficile a pensarlo che a farlo.
Io non ne assemblavo uno da tempo ma non ho avuto nessuna difficoltà.
Questo vale soprattutto se compri componenti di media-alta qualità.
Ad esempio ho speso un pò per il case ma il cable management è stato davvero un gioco da ragazzi perchè ogni componente aveva il suo posto e alcuni anche varie possibilità di spostamento e spazio
Ok, ho compreso. Se acquisto pezzi di qualità potrei riuscire ad assemblarlo anch’io. Grazie Liberty.
New Intel factory cpu coolers look so much better than what they used to be. I get the point of giving one out with the cpu but the old ones look terrible and for the most part were not good enough depending on the ambient temperature, my old go to was always the Cooler Master Hyper 212 tower basic but functional, build looking good 😎✌️
Yes you are right it has improved a lot in the appearance of intel heatsinks compared to the past, and I have seen that there are also boxes that have the intel heatsink with LEDs.
In my case I wanted to give the stock heatsink a chance and if I experience very high temperatures in the future I will immediately replace it with a higher quality heatsink with a quality thermal paste.
I have not yet pressurized the new pc that I completed today but so far the CPU temperature has never exceeded 50°
It looks like you got a decent deal. I am a bit wary about some sites and I hope that all the parts work out. Are you taking your time building your PC?
I bought many components from Amazon by first reading component reviews while the components I got from other stores I preferred to look not only at the price but also at the store reviews.
All the components arrived early except the cpu which arrived a few days late but I also found a very good price.
I built my pc in my spare time but even though I haven't built any in a long time it took me about 2 hours total and the computer is now up and running and I just need to transfer data and reinstall the applications I use most.
!LOL
!PGM
lolztoken.com
It was clear from the gecko.
Credit: reddit
@libertycrypto27, I sent you an $LOLZ on behalf of gameexp
(2/10)
Farm LOLZ tokens when you Delegate Hive or Hive Tokens.
Click to delegate: 10 - 20 - 50 - 100 HP
!LOL
!PGM
lolztoken.com
They eventually fired him.
Credit: reddit
@gameexp, I sent you an $LOLZ on behalf of libertycrypto27
(1/10)
Nella mia esperienza la cosa più difficile da montare di un pc è sempre il dissipatore 😂 non so perchè, ma 9 volte su 10 hanno gli attacchi o fatti in maniera assurdamente complicata oppure di una qualità talmente scadente che ti chiedi come anche solo possano aver pensato che una cosa così potesse andare bene... ovviamente parlo di quelli stock, perchè se uno compra quelli di marca le cose cambiano notevolmente (Noctua, BeQuiet, etc). Per un uso non intensivo anche quelli stock comunque fanno il loro lavoro, per cui è giusto dare loro sempre una chance :)
!hiqvote !PGM !LOL !PIZZA
lolztoken.com
But I don't have thyme for that rubbish.
Credit: reddit
@libertycrypto27, I sent you an $LOLZ on behalf of arc7icwolf
(1/10)
Si hai perfettamente ragione e se non avessi scelto di dare prima una chance al dissipatore stock avrei impiegato 3-4 minuti, proprio avendo ricordo di precedenti dissipatori ho letto prima per bene le istruzioni proprio sulle viti del dissipatore :)
!PGM !LOL !PIZZA !WINE
@arc7icwolf, the HiQ Smart Bot has recognized your request (1/1) and will start the voting trail.
In addition, @libertycrypto27 gets !LOL from @hiq.redaktion.
For further questions, check out https://hiq-hive.com or join our Discord. And don't forget to vote HiQs fucking Witness! 😻
lolztoken.com
hot or cold?, Hot, because you can easily catch a cold.
Credit: reddit
@libertycrypto27, I sent you an $LOLZ on behalf of hiq.smartbot
(6/8)
Farm LOLZ tokens when you Delegate Hive or Hive Tokens.
Click to delegate: 10 - 20 - 50 - 100 HP
$PIZZA slices delivered:
@libertycrypto27(1/15) tipped @captainquack22
arc7icwolf tipped libertycrypto27
libertycrypto27 tipped chessbrotherspro
libertycrypto27 tipped arc7icwolf
libertycrypto27 tipped indiaunited
captainquack22 tipped libertycrypto27
[@PowerPaul:] Buddy! Thank you so much for empowering the @cryptocompany voting service!
As always: Hive a great day!
lolztoken.com
He told me to stop going to those places.
Credit: benthomaswwd
@libertycrypto27, I sent you an $LOLZ on behalf of ccceo.voter
(5/6)
NEW: Join LOLZ's Daily Earn and Burn Contest and win $LOLZ
thanks for the support
Would it have cost a lot if you paid someone to put all the components together? That's assuming you didn't have the technical know-how. A lot of people in my country most get the ready made one.
Nice to see that it's finally coming together
It would have cost me about 100 euros by having professional people do the work, but I preferred to do it myself because when I was a kid I did it as a job for a short period of time and most importantly I saved money because I could choose every single component.
Building a pc is something that may seem difficult but is actually very easy especially if you use quality components. For example, the case I purchased is almost completely removable and cable management was very easy.
built the pc in several steps when I had free time but it will have taken me about 2 hours altogether considering also the installation of the operating system and now I just have to transfer the data and install the applications I used in the old pc
Thanks for the comment my friend and hava a nice day
You did a good job by setting it all by yourself. I wonder how you’re able to do this and I’m someone who still finds it hard to do something even after checking the manual
Good job and I hope it lasts for long
Building a desktop computer is harder to think about than to do, and it's even easier if you use quality components ;)
thanks for your comment and good wish about the durability of my new pc
Hello friend, I can't keep writing because of the laughter I got from your PC comment 🤣😂
Congratulations on the new acquisition, clearly there is a HUGE improvement in component quality. I'm confused, did you leave the same video board in? Or did you change it? Because in the description it says one thing, but I see in the picture that you bought the 4060, hehe, how powerful. I guess that by the configuration of the rest of the components is the 4060 hahaha.
You are absolutely right :)
In the configuration of the new pc I mounted an RTX 4060 but I accidentally wrote down the old video card :)
I corrected the post thanks to you
Thanks for stopping by and leaving a comment
Have a nice day
hello.... great to see how other people improve their computers. when i saw that it was an i5 14600 i was left with my mouth open hahahaha. i'm looking forward to change my pc dinosaur too, but i'm still gathering, it won't be far away from what you put together.
congratulations.
pd: as soon as you can, change the fancooler of the factory processor, for one of tower, I have seen that in AliExpress there are some good ones, and they are not so expensive. If you need help tell me and I'll pass you the link, even if it is good, it is not recommended to use it.
A hug
Yes you are right about the processor fancooler.
I have no need to overclock at the moment so I wanted to give the stock heatsink a chance but if I notice too much other temperatures I will immediately buy a better one and also add a quality thermal paste.
Thank you for the comment and advice which I really appreciate
Have a nice day :)
There are some things to keep in mind while doing online shopping. If the website is not good, then the quality is not good.
Absolutely yes
I recommend looking at the price only in combination with reliable shops with many positive reviews.
For example, when I chose where to buy the CPU I discarded 3 shops that offered better prices and I chose the fourth best price because the shop had more than 3K reviews and 99% were positive
Yeah. Thats really good.
Congratulations!
✅ Good job. Your post has been appreciated and has received support from CHESS BROTHERS ♔ 💪
♟ We invite you to use our hashtag #chessbrothers and learn more about us.
♟♟ You can also reach us on our Discord server and promote your posts there.
♟♟♟ Consider joining our curation trail so we work as a team and you get rewards automatically.
♞♟ Check out our @chessbrotherspro account to learn about the curation process carried out daily by our team.
🏅 If you want to earn profits with your HP delegation and support our project, we invite you to join the Master Investor plan. Here you can learn how to do it.
Kindly
The CHESS BROTHERS team
thanks a lot for the support
!ALIVE
!PIZZA
@chessbrotherspro! You Are Alive so I just staked 0.1 $ALIVE to your account on behalf of @ libertycrypto27. (1/10)
The tip has been paid for by the We Are Alive Tribe through the earnings on @alive.chat, feel free to swing by our daily chat any time you want, plus you can win Hive Power (2x 50 HP) and Alive Power (2x 500 AP) delegations (4 weeks), and Ecency Points (4x 50 EP), in our chat every day.

Qué increíble lo que se puede llegar a hacer con una máquina tan impresionante como esta.
Excelente amigo espero que le saques el máximo provecho a tu inversión.
Espero agilizar enormemente las operaciones que realizo habitualmente.
Muchas gracias por su comentario
!ALIVE
!WINE
@fabian98! You Are Alive so I just staked 0.1 $ALIVE to your account on behalf of @ libertycrypto27. (2/10)
The tip has been paid for by the We Are Alive Tribe through the earnings on @alive.chat, feel free to swing by our daily chat any time you want, plus you can win Hive Power (2x 50 HP) and Alive Power (2x 500 AP) delegations (4 weeks), and Ecency Points (4x 50 EP), in our chat every day.

Dam bro, nice upgrade/build. Glad to see you beastin as usual. Cheers to good days, and to continuing to build up. I been little too quiet, so its time to start quackin up a storm.
!LOL
!PGM
!PIZZA
lolztoken.com
Which is why I still live with my parents.
Credit: reddit
@libertycrypto27, I sent you an $LOLZ on behalf of captainquack22
(2/8)
Farm LOLZ tokens when you Delegate Hive or Hive Tokens.
Click to delegate: 10 - 20 - 50 - 100 HP
Absolutely yes my friend, Hive needs your quacks! ;)
A big hug
!LOL
!PIZZA
!ALIVE
@captainquack22! You Are Alive so I just staked 0.1 $ALIVE to your account on behalf of @ libertycrypto27. (1/10)
The tip has been paid for by the We Are Alive Tribe through the earnings on @alive.chat, feel free to swing by our daily chat any time you want, plus you can win Hive Power (2x 50 HP) and Alive Power (2x 500 AP) delegations (4 weeks), and Ecency Points (4x 50 EP), in our chat every day.

lolztoken.com
but then I turned myself around.
Credit: theabsolute
@captainquack22, I sent you an $LOLZ on behalf of libertycrypto27
(1/10)
Delegate Hive Tokens to Farm $LOLZ and earn 110% Rewards. Learn more.
Hello libertycrypto27!
It's nice to let you know that your article will take 6th place.
Your post is among 15 Best articles voted 7 days ago by the @hive-lu | King Lucoin Curator by keithtaylor
You receive 🎖 1.6 unique LUBEST tokens as a reward. You can support Lu world and your curator, then he and you will receive 10x more of the winning token. There is a buyout offer waiting for him on the stock exchange. All you need to do is reblog Daily Report 280 with your winnings.
Buy Lu on the Hive-Engine exchange | World of Lu created by szejq
STOPor to resume write a wordSTART